It’s class time – come join me!

It’s Marathon time! Gather your scrapbook supplies, some bits and pieces from your stash along with lots of your pretty papers and join us in this next Scrap your Stash Marathon set for Sunday, Oct. 20.

life travelers640

You’ll learn to use papers and embellishments you already have in your stash. Dig deep and bring those buttons, numbers, washi tapes, threads, lace and more to use in your layouts. I can help show you how to incorporate those things you’ve been holding onto into your page layouts.

Moments together640

Bring a couple border punches and see how to use them to create pretty paper edges on your layouts. Use Ranger’s Distress Inks and edge distressing tool to create a worn, vintage look.

sister640

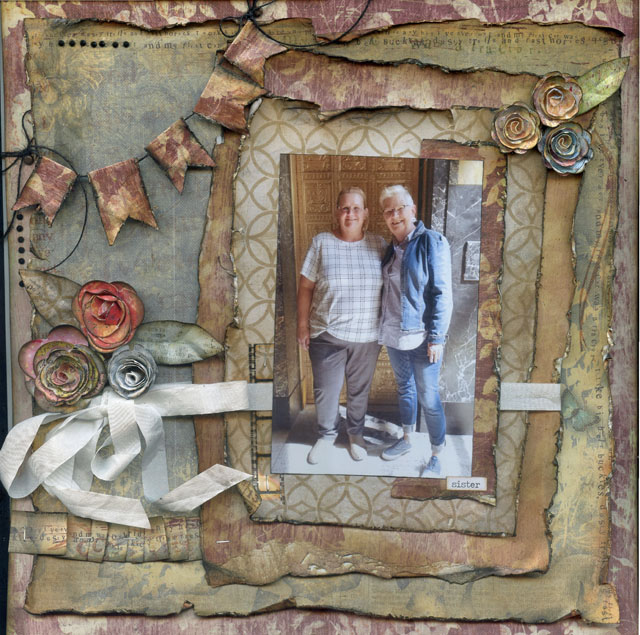
I’ll show you how to make flowers from your scraps! Or bring all those pretty packaged flowers you’ve been saving for a special layout and use them up!

dinner640

So gather your supplies and invite your friends to join us for a full day of scrapbooking classes. You have the opportunity to complete four beautiful layouts from the supplies you bring with you. It’s a fun-filled day with crafty people! Class runs 10 a.m. to 5 p.m. Sunday, Oct. 20.

Register in my online store where you’ll also find the supply list (click ‘view more’). Photos can be any size – mine always vary in size depending on my mood. Additional photo can always be added to these layouts as well.

Peace & Love, Hippie-Style

And if scrapbooking isn’t your thing, how about art journals? My next Adventures in Art Journal begins Monday, Oct. 28 and continues each Monday through Nov. 18. Classes run 6-8 p.m. at the CoBACH Center in Brighton.

This series (No. 10!) is all about Peace & Love, Hippie-Style. When I sat down to play with my paints and stamps it just happened. That old hippie in me came out! The colors, the style; it just happened.

hippie peace freaks_edited-1

I really hope you’ll join me and let your inner hippie out too! Feel the freedom to play – just play! You’ll use paints, stamps, markers, bits-n-pieces of this-n-that creating lively, colorful pages that will just make your heart feel good. This series ends with a twist and you won’t know till the very end just what that twist is – it’s a secret!

So go buy your mixed-media paper or journal, toss your paints, brushes, markers and gesso in a bag and get ready for class. Register for this Peace & Love series in my online store where you’ll also find a supply list (click ‘view more.’)

I’d love to have you join me for class. Let me know if you have any questions. Come have fun with us! Follow me on Facebook and Instagram.

Free time & demo for Art Journal students

I’ve set up two hours of free play time for my students who have taken my Adventures in Art Journal. Bring your previous pages to work on or finish, products you might have questions on, or a demo you’d like to see. I’ll be there at the CoBACH Center at 5 p.m. Monday, Oct. 21 and we can stay until 8 p.m. Let me know if you’ll be there.

Mirror, mirror on the wall

Someone in a forum I follow recently asked about painting a mirror so the dark wood around the frame doesn’t reflect once you’ve changed the color of the frame.

If you stop to think about it, it really is tricky. It’s impossible to get a paint brush between the mirror and frame and most first-time painters wouldn’t even think about this until they were done. That was my first ah-ha moment anyways.

Linda_Neff_Green_Door_Studio_retro_shadow_box_mirror

I had finished cleaning and painting this beautiful vintage shadow box mirror only to see the ugly brown wood where the frame hits the mirror. I couldn’t live with that. My only option was to remove the backing. Lots of work and you really need to be careful not to break the mirror.

This is a mirror I recently worked on. Probably early American style from the 70s or 80s.

mirror with photo bomb doggie

Here’s the steps I now use when painting mirrors. First I remove the backing carefully if there is one.

backing

A lot of times you’ll find vintage mirrors and the backing is gone. Reserve all your nails, screws, supports, etc. in a small cup or container to reuse.

You’ll want to scrub it down really good. Sometimes these have been stored in damp basements, barns and musty sheds. After scrubbing and rinsing then give it a quick scuff sanding with a fine grit sandpaper and clean again.

cleaning

Next up is the painting. I usually give the mirrors at least two coats of good paint allowing overnight dry time in between. Be sure to paint that inside rim and backing as well for a fresh new look. That inside rim is so important because that reflects back onto the mirror and is visible once assembled. So paint it well and neatly. I tend to seal my painted mirrors with a coat of clear or dark wax depending on the look I’m going for.

backside painted

After thoroughly dry, it’s time reassemble. I use all the parts that came with it originally if they’re in good, solid shape. At times you may need to add some cardboard to hold the frame tightly against the back or cut a totally new backing. I use luan for this. It’s fairly thin and pretty affordable and easy to cut. I trace the pattern onto the luan and cut either larger or smaller depending on if I traced the outside or inside of the mirror frame.

Be careful assembling, especially if you are screwing or nailing into the backing, so you don’t hit the mirror. The truly old mirrors could be a quarter inch thick and more. They weigh a ton and shatter everywhere if broken. Safety goggles is a good idea when working with the glass portions. Also make sure if you’re using new hanging wire that it is strong enough for the load.  These vintage mirrors can be beautiful once painted and cared for and look great hanging in our homes today. The dark teal mirror is available in our Salvaged Wildflowers’ booth at The Vintage Farm House in Holly. Good luck on your next mirror project!

Here’s the finished projects (sorry, the shadow box mirror is sold).

For more tips on things around your home, painting, transfers, etc. check out our groups’ Designing Dames Facebook page. I’m with three other talented women – all small business owners – and we’re offering tips and techniques on a variety of subjects.

Enjoying the craziness

Like most of you, I feel November and December can tend to get pretty crazy. But we wouldn’t have it any other way would we! I have so much fun creating and yet, I’ve had my days where I get up with so much to do, then just sit and stare into space because I just don’t know where to start, completing absolutely nothing! And you know what? I really don’t give a damn! Usually by the next day those feelings are gone and I’m back to life-as-usual.

I still have several Christmas gifts to make but right now I only need to work on the ones that need to be shipped this weekend (the others I have till Christmas Eve). I’ve learned to break everything down into little jobs and not to worry if something doesn’t get done. It’s not the end of the world – just the holiday as I imagine it. No one will know that I planned on making 27 dozens of cookies and didn’t get it done. Or that I intended to make 125 Christmas cards to send to everyone I know (but actually only mailed 30)!

But here’s what I have accomplished over the past few weeks.

fabric stars2

I sat one night while watching TV and hand cut these stars. Stitched them together, stuffed them, lightly painted and glittered, and added some cute messages to them. I call them my message stars and they’re for sale in my booth for $5 at The Vintage Farm House. I love them! They’re just cute little bowl fillers or attach a string and hang them from a cupboard knob.

fabric stars1

I’ve made several holiday and seasonal banners. I love banners hanging in the house. They can be used to announce a season, holiday, birthday, love, or hung just to make someone smile.

merry christmas banner

This is a large one and it sells for $18 in the booth, but I also custom make these and can ship them anywhere for you!

While working and creating for the booth I also teach scrapbooking and art journal classes in my home. Those keep me on my toes and very busy. I have a good number of great students and I know they’re always looking to learn new techniques or to get some photos scrapped. Art Journal has become my favorite class to teach this year. It’s just a joy to watch the students grow and learn.

art journal heart and home

These pages are from my Heart & Home Art Journal series that we’re finishing up next week. I’m taking January off to develop and work on classes and then we’ll start back up in February. Hopefully the break after the holidays will bring everyone back with a fresh and renewed energy for learning and sharing.

heart and home hearts

Last year I started what I had hoped would become an annual event. I host a Christmas gathering for a small group of friends, co-workers and teachers that met and formed friendships through Scrap Tales years ago. We don’t always have the opportunity to visit and catch up so this evening is all about us, good food, friends, and playing catch-up. We added the PJs this year and, Oh my gosh!, it is a game changer! So comfy!

group2b

These guys, my family, and my students, are the most important things in my life right now. It’s so much fun getting together with them for the holiday for a few hours. Plus, I’ve been making plans with the family too. The old guy and I started off right after Thanksgiving with a Mystery Dinner Train Ride – just me and him and three train cars full of people we didn’t know (it was fun!). Last week was Frankenmuth chicken dinner and the lights. This week we’re heading to Crossroads Village and the train ride with Rachel and Kevin, and tomorrow we’re meeting family from out of town at the Veteran’s cemetery in Holly then out for lunch.

annual christmas gathering

So if a gift doesn’t get made, or the cookies don’t get baked, it really is no big deal. I’m still going to go out and have fun and make more memories with friends and family this holiday! You should too!